Showing posts with label happy birthday. Show all posts

Tuesday, December 6, 2016

Number of Years - So Suzy Stamps Guest Designer


Hello!  Thank you so much for stopping by.  In the month of December, I will be a guest designer 3 weeks for So Suzy Stamps.  I am so excited to show some awesome stamps this month! This month from the 1st- 15th any order over $25 ships FREE !!!   Be sure to go check out the goodies at So Suzy Stamps.
 
So Suzy Stamp used:  Number of Years

Let’s face it; you are always in need of a birthday card!  There are so many times I get caught red handed without a card.  I made up a few birthday cards so that does not happen.  I’d love to share one.
 

      1.    I love the card bases from Michaels.  The base I am using is of 6.5 x  5

  1.  I embossed the yellow card stock with a Darice birthday folder. 
  2.  I then placed a mat under the embossed cardstock.
  3.  I took the stamp I would be using… Age is merely the number of years the world has been enjoying you and placed this on the balloon.  I wanted to be sure it was a for sure fit.
  4. Using the MISTI I then stamped and with white embossing power, I heat set the stamped sentiment.
  5. I used foam tape to raise this balloon
  6. The finishing touches came with a white gel pen.  I added little dots around the red balloon for some interest.  I then took a few pieces of twine and made the strings.


I hope this inspires you to make birthday cards so you too can be prepared!

Be sure to stop by daily for HUGE inspiration of the Guest Designers all December.
So Suzy Stamps Blog


Wednesday, August 24, 2016

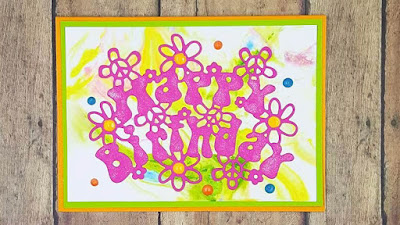
Retro Happy Birthday!

Hello!  Thanks so much for stopping by.  Featuring the Retro Happy Birthday die from Die Versions.    The retro line is so fun I decided to play around.  I do apologize, but the Retro Happy Birthday is out of stock right now.  Check out the other Retro Dies available here.
 
To create my background I used the shaving cream technique.  I watched a few YouTube videos to get the feel for it.  This is a super messy technique, but oh so pretty.  I knew I wanted a 'retro' or tie dye look.. so I chose the reinker colors I thought would look best for that 'style'.  I used the reinkers from So Suzy Stamps and they are just perfect for the look I was going for.
 
I made these before I went to bed so it would be dry the next day.  I do have to say the shaving cream smelled wonderful!  LOL
 
 
Here is what I ended up with.  You get TONS of prints out of one shaving cream session.  I could have done even more by adding other colors near the end.


I then cut the Retro Happy Birthday die on pink paper to make it stand out.  I glued it down and applied Spectrum Noir clear sparkle.  This can dress anything up and who doesn't love a glitter look!  I then finished it off with some new Ranger enamel accents. 


Have a great day! 

Monday, April 11, 2016

Happy Birthday - SVG

Think outside the box for your projects!! This little gal is the freebie digi stamp for the week at Craftin Desert Divas. Shop Cutie Milk Carton can can also purcahsed in the SVG file format.

I had a black gift bag and knew I could dress it up!  Craftin Desert Divas now offers SVG files for purchase in their store!  If you kiddo loves Shopkins.. they will love what you can do with the Shop Cuties! 
 
...
Other Craftin Desert Divas products used:
Fancy Stitched Lable Dies - http://craftindesertdivas.com/fancy-stitched-label-dies/
Bring on the Cake - http://craftindesertdivas.com/bring-on-the-cake/
Pizazz sequins - http://craftindesertdivas.com/pizazz-sequins/


Wednesday, March 9, 2016

Happy Birthday and SVG Files

Hello!  Thanks so much for stopping by
 
Today I am so incredibly excited to say that Craftin Desert Divas has released SVG cut files for the Shop Cutie collection.  If you have a cutting machine, this should make you extremely happy!   It is so super simple to use SVG's with my Cricut Explore. 
 
So first I saved the SVG file to my computer and extracted that zip file.  Logged into my Cricut Design Space I went to start new project and then upload.  You can upload many different types of files, but I love SVG's because the layers are given for you.  All of the work is done.. You just need to resize the project and simply cut!
 
I decided to raise my stars on the candy bar with foam.  I love dimension so this fit right in.  I also distress inked the squares of the chocolate bar to give it a slightly different chocolate look. 
 
So after I had all of my pieces cut I assembled my little candy bar shop cutie to get the idea how I wanted her.  I then make my card base which included my most favorite die set ever from Craftin Desert Divas... Fancy Frames.  Adding Happy Birthday from Bring on the Cake stamp set and embossed this with Brutus Monroe Alabaster powder.. BTW it is a gorgeous pure white..   Topped it off with some sequins .. perfect CUTE card!
 
Products used:
This is the Shop Cutie Candy Bar file used for my project http://craftindesertdivas.com/shop-cutie-candy-bar-cutting…/
All svg cut files can be found here: http://craftindesertdivas.com/cutting-files/...
Craftin Desert Divas products also used in this project:
Fancy Frames:
http://craftindesertdivas.com/fancy-frame-dies/
Bring On The Cake: http://craftindesertdivas.com/fancy-frame-dies/
Pizazz Sequins: http://craftindesertdivas.com/pizazz-sequins/
Brutus Monroe - Alabaster Embossing powder
 
I hope this has sparked some creativity! 
Happy Crafting


Saturday, February 13, 2016

Happy Birthday Scrapbook Layout

Hello!  Thanks so much for stopping by
 
Today I'd like to share a scrapbook page made for a weekend birthday hop at Craftin Desert Divas.  If you have been wanting to try some digital stamps.. 
 
I took out my 12x12 paper (which felt weird because I have been really just making cards).  I wanted the 'cow' look to my background.  I used distress spray in black.  I suppose I could have just sprayed the bottle, but I chose to take the spray out and flick with the end of the sprayer bottle.  Just a warning that the it could and probably will go just about everywhere.   Set that aside to let dry.
 
I then took out Pocket pieces hello dies and used the banner to cut out 5 for "Emily".  I wanted her name to be front and center since the day was all about her! The letter cut outs are from Sizzix.  I temporarily lay out my scrapbook pages until I know for sure it's the final layout.  One tip that I saw from a card maker was to take a photo of how you want it to be laid out and that gives you a picture to refer back to!  I thought that was clever and genius.
 
Behind the photo I wanted a different look and not just a rectangle.  So I took out my Stitched scallop dies and cut each side of the rectangle for a cute looking edge. 
 
The cow image is a digital image only available this weekend Birthday Cow, so grab that cutie while you can.  I colored her with spectrum noir markers and it was way too busy to just place her on to the cow print paper... So I took out the Fancy frame dies to make the black background.
 
It was Emily's 2nd birthday so I wanted to document that someway.  I used the small tag from the pocket pieces hello dies and 2nd from bring on the cake placing that under the strings on the balloon to make it look attached. 
 
I then used Happy Birthday from Bring on the cake stamped at the top in Black Onyx Versafine.  I love foam mounting tape so the banners and birthday cow are all raised with dimension.
 
I hope this has inspired you to get your craft on.
Happy Crafting
~Kara
 
Craftin Desert Divas products used


Wednesday, February 10, 2016

Happy Birthday shaker!

Hello!  Thanks so much for stopping by
 
Happy Birthday cards can be used anytime and all year long!  It never hurts to have a few on hand.   I am showcasing the digital image Happy Birthday Hippo found here from Craftin Desert Divas.   
 
I also used the stamp set Bring on the Cake found here
Shaker elements can be found in the sweetness collection
 
I first took Bring on the Cake stamp set and placed Cake Cake Cake and Bring on the Cake to a block and stamped a 6x6 paper.  I wanted a center point for Happy Birthday so I placed that in the middle with a pink color. 
 
I printed the digital hippo, colored and then cut with my Brother Scan N Cut.  I'm impressed with this machine more and more.  It does amazing cuts.
 
 I decided to make my card to a shaker (shaker everything!! LOL).  I went a different route and made it a tiny shaker window highlighting the Happy Birthday sentiment.  To make a shaker you need either fun foam or 3m foam tape.  I use transparency film to make my window.   I hope to start to video my card making soon.  While I'm not a professional shaker maker.. I hope that I can help some who would like to learn. 
 
I can tell the weather makes dry and static filled conditions.. Some of the shaker elements are sticking on the inside of  my shaker window..
 
Once I had all of my elements complete.. I began to layer and assemble the shaker window.  Adding the Hippo and streamers to the top. 
 
I hope this has inspired you to be crafty!
Happy Crafting
~Kara


Friday, September 18, 2015

Happy Birthday Box Card

Hello!  Thanks for stopping by
 
I have had a box card on my wish list for quite some time.  I've seen so many extravagant box cards and also some simple cards.
 
I study up on how I want to go about a card via Youtube, Pinterest and Google.  How do you get inspiration or instructions?
 
I found the exact size I wanted and rolled with it.  It truly is not that hard to make.  I found the hardest part deciding how I wanted to place the embellishments.
 
I started out with the 12x12 white base I wanted.  Using my scoring board and cutter, I cut and scored where needed.  Ending with the box base to be decorated. 


I then cut all of my panels needed.  I knew I wanted the card to be bright and fun for a 7th birthday card.


After I had all of my panels cut,  I used scor tape for a secure hold .


I assembled placed all of the panels onto the box base before I made the final box.  After reading several tutorials, I came to the conclusion that placing the panels on flat would be easiest.  I agree, it would have been tough to do with the box already in box formation.
 
 
Next step was to place the dividers into the center.  I used glue for this.  I wanted a tiny bit of leeway to move it around if need be.
 
Next task was to decide what embellishments I was going to use.  I decided on the Die-Versions stamp set, Make-a-Wish-Stamps and Make-a-Wish-Dies.  I colored in each embellishment with colored pencils and used stickles to accent the confetti. I also added some twine to the balloon strings.
 
Placing these embellishments seemed to be my hardest task of the entire project.  I used transparency film to hold the embellishments.  I knew I wanted a few to be higher than the first layers.  Here is a look from the top.  I ended up covering the original white dividers I had in there.  Using the colorful cardstock from the panels.


It turned out so gorgeous and I am so happy with it.  I can see this style will become my go to and additive card.
 
The celebrate banner came from craftindesertdivas and the banner die cut came from Simon Says Stamp.
 
What kiddo doesn't like a personalized item.. Especially, names you can never find.  Karleigh came from the beautiful set from Studiol2e - Wuwu set
 
The back panel can be used for more embellishments or for your note to the person receiving.  It was 1 am when I was finishing this, so I went with a simple note on the back with some stamps from Craftin' Desert Divas
 
Thanks so much for stopping by!  I'd love to hear your feedback..
 
 
When stopping by Die-Versions, be sure to use the code kara15 for 15% off your order.  Not valid with sales or discounts.