Showing posts with label die versions. Show all posts

Wednesday, August 24, 2016

Retro Happy Birthday!

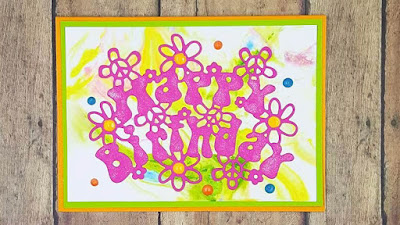
Hello!  Thanks so much for stopping by.  Featuring the Retro Happy Birthday die from Die Versions.    The retro line is so fun I decided to play around.  I do apologize, but the Retro Happy Birthday is out of stock right now.  Check out the other Retro Dies available here.
 
To create my background I used the shaving cream technique.  I watched a few YouTube videos to get the feel for it.  This is a super messy technique, but oh so pretty.  I knew I wanted a 'retro' or tie dye look.. so I chose the reinker colors I thought would look best for that 'style'.  I used the reinkers from So Suzy Stamps and they are just perfect for the look I was going for.
 
I made these before I went to bed so it would be dry the next day.  I do have to say the shaving cream smelled wonderful!  LOL
 
 
Here is what I ended up with.  You get TONS of prints out of one shaving cream session.  I could have done even more by adding other colors near the end.


I then cut the Retro Happy Birthday die on pink paper to make it stand out.  I glued it down and applied Spectrum Noir clear sparkle.  This can dress anything up and who doesn't love a glitter look!  I then finished it off with some new Ranger enamel accents. 


Have a great day! 

Tuesday, June 28, 2016

Just Believe

Hello! Thanks for stopping by today . I'd love to showcase from the Whispers collection .. Dragonfly at Die-Versions
 
 
I started out by die cutting the Dragonfly in gold foil paper.  It is a very thick paper and the die has some intricate cuts so I placed a piece of cardstock folded under my plate for some extra thickness.  It cut perfectly the first time.  I just received my Vagabond 2, so I wasn't sure how thick I would need.
 
My card is 4 x 5.5 in size and I played with my gelatos for this card... Ok, well my purple gelato!  I used watercolor paper and gesso to place a layer over the paper (let this dry).  I then scribbled some gelato and with my spray bottle spritzed and moved the gelato until I was happy with it.  I wanted this card to be simple .. but let me tell you.. it looks stunning in person.
 
I wanted the dragonfly to really be raised, so I placed two layers of adhesive foam .. it was so high that you could see the foam.  I took out  a gold marker and colored it so it would blend in. You can leave the wings as is or I bent them slightly giving them some curve.


I then stamped my sentiment (from My Creative Time)  and embossed in Brutus Monroe gold.  Placed the dragon fly on the card and added a few rhinestone embellishments for the final touch.


Thanks so much for stopping by!  When shopping at Die-Versions be sure to use the code kara15 to save 15% from your order.   This can not be combine with any other sales or promotions.
 
Happy Crafting!
Kara


Wednesday, November 4, 2015

Hello Fall!

Hello!  It's Kara here on the blog.  I reside in Western PA and Fall is usually FREEZING cold, but as I write this.. it is a whopping 70 degrees!  So Hello Fall!
 
I took some watercolor paper and sprayed Starbursts from Lindy's Stamp Gang to create the green background.  For the Hello Fall, I used a mixture of sprays ranging from Lindy's Stamp Gang to the Color Bursts from Ken Oliver to pearlescent sprays.
 
I wanted to make a simple, but beautiful card.  I used the Hello Fall Die from Die-Versions to be my heading.  I love this die as there is so many ways you could display this on a card.    I went simple and do I ever love how it turned out!
 
I then took some twine from Annie's Paper Boutique and wrapped around a few times.  I then used the Blessed stamp (Thankful Squeaks set) from Craftin Desert Divas and the tag die from her Pocket Pieces Die set. I attached the Blessed tag to the twine and gave it a little glue to hold in place.
 
The two small leaves came from Simon Says Stamp die set Maple Leaf Corner.  I used the Dylusions orange paint to add some fall color.
 
I adhered the main green background to my Kraft Brown (oohhh I love Kraft Brown, LOL) and just like that the card was complete!  I love love how it turned out.
 
Thanks so much for stopping by! 
 
As always, when purchasing goodies from the Die-Versions shop use kara15 to save 15% (can not use with other sales or discounts)
 
~Kara


Friday, September 18, 2015

Happy Birthday Box Card

Hello!  Thanks for stopping by
 
I have had a box card on my wish list for quite some time.  I've seen so many extravagant box cards and also some simple cards.
 
I study up on how I want to go about a card via Youtube, Pinterest and Google.  How do you get inspiration or instructions?
 
I found the exact size I wanted and rolled with it.  It truly is not that hard to make.  I found the hardest part deciding how I wanted to place the embellishments.
 
I started out with the 12x12 white base I wanted.  Using my scoring board and cutter, I cut and scored where needed.  Ending with the box base to be decorated. 


I then cut all of my panels needed.  I knew I wanted the card to be bright and fun for a 7th birthday card.


After I had all of my panels cut,  I used scor tape for a secure hold .


I assembled placed all of the panels onto the box base before I made the final box.  After reading several tutorials, I came to the conclusion that placing the panels on flat would be easiest.  I agree, it would have been tough to do with the box already in box formation.
 
 
Next step was to place the dividers into the center.  I used glue for this.  I wanted a tiny bit of leeway to move it around if need be.
 
Next task was to decide what embellishments I was going to use.  I decided on the Die-Versions stamp set, Make-a-Wish-Stamps and Make-a-Wish-Dies.  I colored in each embellishment with colored pencils and used stickles to accent the confetti. I also added some twine to the balloon strings.
 
Placing these embellishments seemed to be my hardest task of the entire project.  I used transparency film to hold the embellishments.  I knew I wanted a few to be higher than the first layers.  Here is a look from the top.  I ended up covering the original white dividers I had in there.  Using the colorful cardstock from the panels.


It turned out so gorgeous and I am so happy with it.  I can see this style will become my go to and additive card.
 
The celebrate banner came from craftindesertdivas and the banner die cut came from Simon Says Stamp.
 
What kiddo doesn't like a personalized item.. Especially, names you can never find.  Karleigh came from the beautiful set from Studiol2e - Wuwu set
 
The back panel can be used for more embellishments or for your note to the person receiving.  It was 1 am when I was finishing this, so I went with a simple note on the back with some stamps from Craftin' Desert Divas
 
Thanks so much for stopping by!  I'd love to hear your feedback..
 
 
When stopping by Die-Versions, be sure to use the code kara15 for 15% off your order.  Not valid with sales or discounts.


Wednesday, September 16, 2015

September is Prostrate Cancer Awareness month!

Hello!  Thank you so much for stopping by!  I am honored and thankful to be on the DT team for Die-Versions.  I thought for my first project that I would share a card I made.  September is Prostrate Awareness Month and what a way to honor my ahhhhmazing Dad (Prostate Cancer SURVIVOR).  He lights up a room with is whistle and smile! 
 
I started off using the Awareness-Heart from the Whispers Collection and knew I wanted to make it light blue for the Prostrate Awareness. 


I took Versa Magic Brilliance ink and inked away.  The brilliance line doesn't always photograph nice, but in person I assure you it gives a gorgeous shine and shimmer.


I knew I wanted to make this a shaker card (who doesn't love a shaker card).  So I then took transparency film and attached it to the heart. 
 
 
Added some foam to make it stand away from the cardstock.  I then added some random blue glitter, sequins and microbeads.  I purposely added a few pink hearts because after all my Dad was the first guy to ever have my heart.
 
 
I used the stamp set 408 Pink Ribbon Background from Sparkle N Sprinkle.  Stamped the background using the MISTI (seriously this tool is amazing).  I then embossed with Hero Arts Clear.
Also, on that stamp set comes a survivor stamp.  I stamped this 2 times along each side and again embossed with clear.
 
 
I decided the hearts on the background stamp needed to be blue.  So I took a colored pencil and lightly colored in the hearts.
 
 
I then pieced everything together and attached my shaker portion to the main card.  I absolutely love how this turned out and what a way to honor my Dad.  Cheers to him being a survivor!
Thank so much for taking time to read my blog post!  I'd love to hear any feedback you may have.   Please be sure to check out the other blog posts for the Die-Versions amazing design team here.
 
Stop by and shop, shop, shop at Die-Versions.  If you love to save money, be sure to use coupon code: kara15 to save 15% (not valid with any other discounts or sales).
 ~Kara


Monday, September 14, 2015

Die Versions creative design team announcement

Hello!  Thank you for stopping by Create By Kara
 
I have some amazing news that I'd love to share with you.  I have been chosen to be on the Die Versions design team.  I am over the moon excited to share my creations and I hope to inspire you!
 
I have a special coupon code that will be just for YOU!  (keep reading to the end)
 
I have been a scrapbooker for YEARS and this will be an outlet for me to share.  I love the craft community, because one person can inspire many.  There are so many beautiful ideas on the internet and I am thrilled to be sharing mine with you.
 
If you love working with dies, this blog will be for you.  If you have never worked with dies, this blog is for you.. tricky, huh!  I'd love to answer any questions you have, if you are just starting out.  I never claim to be a professional, but I do claim to love crafting.
 
The link to check out and purchase from Die Versions is Die-versions  .  ANY purchase you make will give you 15% off your total purchase.  ** Code not valid with other discounts/sales **  Enter code:  kara15
 
 
~Kara