Showing posts with label so suzy stamps. Show all posts

Tuesday, February 21, 2017

Be what you want to BE

Hello!  Thanks so much for stopping by
 
Have you ever tried mirror image stamping??  I had not ... until I made this card for the So Suzy Stamp Mirror Image event.   I can see this will be a technique I will use more in the future... You definitely need a good silhouette stamp or solid image for this to work well. 
 
Products used from So Suzy Stamps:
 
I first took my sun stencil and made my background.  I blended out the inks to make a more vibrant look using Tiki Torch and Orange Twist from Catherine Pooler.
 
I then held my breath and had Justine Hovey's YouTube video playing while I gave it a try.  Believe it or not, this was my first try.  After I did it, I said geez.. why didn't I practice on a scrap piece of paper first.  Anyways, thank goodness it turned out great the first try.
 
I love this technique and I'm so glad So Suzy Stamps hosted the challenge.  I love to try to things and this will be one I keep in my think tank.
 
 
This card is entered into the challenge:


Tuesday, December 6, 2016

Number of Years - So Suzy Stamps Guest Designer


Hello!  Thank you so much for stopping by.  In the month of December, I will be a guest designer 3 weeks for So Suzy Stamps.  I am so excited to show some awesome stamps this month! This month from the 1st- 15th any order over $25 ships FREE !!!   Be sure to go check out the goodies at So Suzy Stamps.
 
So Suzy Stamp used:  Number of Years

Let’s face it; you are always in need of a birthday card!  There are so many times I get caught red handed without a card.  I made up a few birthday cards so that does not happen.  I’d love to share one.
 

      1.    I love the card bases from Michaels.  The base I am using is of 6.5 x  5

  1.  I embossed the yellow card stock with a Darice birthday folder. 
  2.  I then placed a mat under the embossed cardstock.
  3.  I took the stamp I would be using… Age is merely the number of years the world has been enjoying you and placed this on the balloon.  I wanted to be sure it was a for sure fit.
  4. Using the MISTI I then stamped and with white embossing power, I heat set the stamped sentiment.
  5. I used foam tape to raise this balloon
  6. The finishing touches came with a white gel pen.  I added little dots around the red balloon for some interest.  I then took a few pieces of twine and made the strings.


I hope this inspires you to make birthday cards so you too can be prepared!

Be sure to stop by daily for HUGE inspiration of the Guest Designers all December.
So Suzy Stamps Blog


Monday, October 24, 2016

Pull yourself together!

Hello!  Thanks so much for stopping by
 
 
When I have ideas for a card, generally I have an idea of who it will be for.   I need to definitely get better at mailing cards, but when I had the idea for this card... I just knew it would be going to one of my girlfriends.  I wouldn't be surprised if it ends up on her desk at work.. She has an amazing sense of humor.
 
I started with the Sizzix Elegant Stand ups for my base.  These give such a gorgeous base (and I may have many of Stephanie's dies).  I also cut the strip along the bottom while cutting the base.  I later added pearls along that strip to dress it up.
 
I then took the stamp Pour Yourself a Drink from So Suzy Stamps and heat embossed in Brutus Monroe gold.  Added some foam dots to raise the panel and a few flat back pearls.
 
Finally, I tied a bow and glued it down.. and a gorgeous stand up card is the end product.
 
 
This card is entered into the Simon Says Stamp Wednesday Challenge:  Link
 
 
Affiliate links may be used in my blog.  This does not cost you anything to purchase. 


Sunday, October 23, 2016

Be careful what you wish for....

Hello!  Thank you so much for stopping by
 
About a month ago, Suzy from So Suzy Stamps asked if I'd be interested in being a Snark Ambassador... and I said YES!  Through out the months I'll be making cards to show Snarky stamps from her line.  You can check out her line of Snarky here 
 
I started to make my card and quickly that turned into 2 cards in different colors and shapes. 
 
I started off stamping the Spray stamps in random pattern and colors.  I came up with two combo of colors that I just love.  I used all So Suzy Ink Bites for my cards. 
 
My first card, I knew what I wanted in my head.  I used a 5.5 x 5.5 card base and cut a panel from white card stock.  I then took the inside out circle die from My Favorite things and centered to cut.  I stamped my sentiment and placed foam tape on the back of my panel to make it pop.
 
 
My 2nd card was pretty basic.  I loved the sentiment and wanted a different color card.  I used the inside out rectangle die from My Favorite things and foam tape to pop that up.  It was a super simple and quick card.


So Suzy Stamps products used:
 
Spray (regular and Mini:  here
Be Careful What you wish for:  here
Ink Bites:  here


Affiliate links are used in this blog.  This does not cost you extra.  It let me keep blogging and sharing. 


Saturday, September 17, 2016

You've got this!

Hello!  Thanks so much for stopping by
 
It is the 17th of September and that means it is your monthly reminder to do a self check breast exam.  I am truly honored to participate each month in this blog hop.  This months theme is Girl Power!


CAS-UAL FRIDAY's  has their own line of stamps and dies mainly for Breast Cancer cards and it is called Calling All Sistahs and 50% of the profits from the sales of the Calling All Sistahs line goes to the National Breast Cancer Foundation, Inc. for research and medical help.  Check out the line here.  Anyone is welcome to participate in the Blog Hop that happens on the 17th of each month. 
 
**There will be a $15 Gift Certificate given to 3 people that comment along the hop.**   Comments close on September 19th at midnight EST.


Your next stop on the hop is the talented Jeanne Jachna

You can learn all about how Calling All Sistahs got started here.

If you are a facebooker, we'd love for you to join us in our Facebook group! Click here to join
This group is for hop stops, hoppers, and anyone interested in Calling All Sistahs :)
 
If you should get lost along the way please go back to the CAS-ual Fridays Calling All Sistahs Blog Hop.  
 
So remember we have all come together for this blog hop to encourage our Sistahs to do their monthly breast self-exams and yearly mammograms!!
 
I highly encourage you to join in on this fun blog hop by participating.   The more awareness we create.. the more lives we can save.  Just a simple self check can save your life and the life of a friend.
 
Here is my card for the hop!

Cas-ual Fridays products used:
Curtis Background:  http://cas-ualfridaysstamps.com/products/curtis-background
Calling all Sistahs:  http://cas-ualfridaysstamps.com/products/calling-all-sistahs
Dream then Do:  http://cas-ualfridaysstamps.com/products/dream-then-do

Other Products used: 
So Suzy Ink bites:  http://www.sosuzystamps.com/summer-solstice-ink-bite-set/
Craftin Desert Divas shaker tag dies: http://craftindesertdivas.com/shaker-tag-dies/


Your next stop on the hop is the talented Jeanne Jachna


Wednesday, August 24, 2016

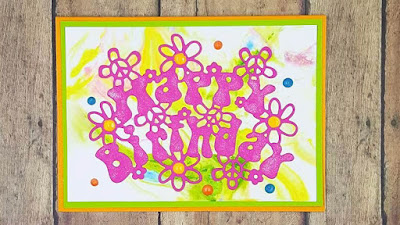
Retro Happy Birthday!

Hello!  Thanks so much for stopping by.  Featuring the Retro Happy Birthday die from Die Versions.    The retro line is so fun I decided to play around.  I do apologize, but the Retro Happy Birthday is out of stock right now.  Check out the other Retro Dies available here.
 
To create my background I used the shaving cream technique.  I watched a few YouTube videos to get the feel for it.  This is a super messy technique, but oh so pretty.  I knew I wanted a 'retro' or tie dye look.. so I chose the reinker colors I thought would look best for that 'style'.  I used the reinkers from So Suzy Stamps and they are just perfect for the look I was going for.
 
I made these before I went to bed so it would be dry the next day.  I do have to say the shaving cream smelled wonderful!  LOL
 
 
Here is what I ended up with.  You get TONS of prints out of one shaving cream session.  I could have done even more by adding other colors near the end.


I then cut the Retro Happy Birthday die on pink paper to make it stand out.  I glued it down and applied Spectrum Noir clear sparkle.  This can dress anything up and who doesn't love a glitter look!  I then finished it off with some new Ranger enamel accents. 


Have a great day! 

Tuesday, July 26, 2016

One Sheet Wonder - 10 cards

Hello!  Thank so much for stopping by

Today I have 10 cards made from ONE piece of pattern paper.  I am a Pinterest addict and will be the first to admit.  I stumbled upon this technique somewhere along the way.  There are so many sketches available on Pinterest.  You will see it called one sheet wonder or one page wonder... both will get you great ideas. 

I found in doing my one sheet wonder that using the sketch measurements on a computer screen as I worked .. worked best for me.  You could also measure out the sketch measurements on the back of your pattern paper and then cut.  Which ever way works best for you.  I really encourage you to try one out.

Here is the sketch I am using.  The link on Pinterest did not lead me to a good link.. so I apologize not being able to Thank the person properly who created this sketch.


I even did a video for YouTube that you can check out here.  Be kind.. I am just learning how to videos.  LOL  Be sure to subscribe and give me a thumbs up!  I'd greatly appreciate any support you all give. 


I absolutely love how these cards turned out.  I never ever do a simple card, but all 10 are very simple with very little embellishments.  This is photo heavy.

Cas-ual Fridays - All About You (from a previously released Stamp of Approval box)

Craftin Desert Divas - Wishful Thoughts & Dies

Concord & 9th - You've Got This

Hero Arts - Kindness

Lawn Fawn - Believe in Yourself

My Favorite Things - Amazing

My Creative Time

So Suzy Stamps

Simon Says Stamp - Uplifting Thoughts

SugarPea Designs - Celebrate

I hope this triggers some creativity in your craftiness.  I'd love to see what you make!
Happy Crafting
~Kara

Tuesday, July 19, 2016

Baby Girl Congratulations!

Hello!  Thanks so much for stopping by.  Today I will be showcasing the Baby Border die available here.


The Baby Border die has so many possibilities.  I created a Congratulations card for a Baby girl.  It is a simple card, but girlie!  I even created a video to show how I did the process.  I am a beginner on videos.. but I thought this one would be a great way to start.  You can find the video here on YouTube.
 
Products used:
Die-Versions - baby border die
Joy Clair - oh Baby
So Suzy Stamps - Ink bites
Lindy's Stamp Gang - Flat Fabio
 
 
Thanks so much for stopping by.  When shopping at Die-Versions, be sure to use kara15 to save 15% from your order.  This cannot be combine with any other sales or promotions. 
 
Stop by daily to see tons of inspiration from the gals here at Die-Versions here.

Sunday, July 17, 2016

Monthly Self Check Reminder!

Hello!  Thank you so much for stopping by
 
Today I want to share a very special card for a blog hop I am participating in.  I do not know of one single person who has not been touched by cancer in some way... Cas-ual Fridays has started a monthly blog hop to remind women to do a monthly self breast exam.  You can read the story on how it began here.  I encourage you to take a few moments to read up on how to do a self exam if you do not know how.  It takes moments to do your self exam and could save your life.  Please remind all of the women in your life to do so.
 
You should have arrived from the blog of Jennifer Ingle.  If you did not or got lost along the way please start back at CAS-ual Fridays Stamps.
 
 
CAS-UAL FRIDAY's  has their own line of stamps and dies mainly for Breast Cancer cards and it is called Calling All Sistahs and 50% of the profits from the sales of the Calling All Sistahs line goes to the National Breast Cancer Foundation, Inc. for research and medical help.  Check out the line here.  Anyone is welcome to participate in the Blog Hop that happens on the 17th of each month. 
 
Here is my card for the hop!


Products used:
 
Cas-ual Fridays Hope Ribbon
Cas-ual Fridays YOU (from a previous Stamp of Approval Box)
Craftin Desert Divas Fancy Frames
Brutus Monroe Alabaster Embossing Powder
 
I first took the Hope Ribbon stamp set and the word HOPE.  On pink card stock I embossed with Brutus Monroe Alabaster powder in rows. I wanted the HOPE to be staggered .. I do have to say I am one of the worst straight line people in the world.. So I did take a ruler and make a cheater line so it would be straight.  After I had all of the hope stamped out and embossed.. I took two tiny hearts from a set called YOU (from a previously released Stamp of Approval set) and stamped in random places using So Suzy Ink Bites in Watermelon and Thistle Thicket.  I then used the largest die in the Craftin Desert Divas Fancy Frames set.
 
For my top layer, I took again the Fancy Frames die and I only wanted a tiny portion for a layer.  I then stamped and embossed hope is stronger than fear .. I added a few more hearts from the YOU stamp set.  I took out my twine (I am trying to use this more) and after wrapping a few times I saw it looked perfect in the grooves from the die.  It worked perfect.  I then added a few flat back pearls and with scor tape I adhered that to my main card .
 
I added some foam tape to the main panel and ran the watermelon ink bite from So Suzy around the outside edge.   My card turned out amazing and I can't wait for this to make someone smile who is going through this terrible disease..
 
Thank you so much for stopping by.. Be sure to comment for a chance to win a gift certificate and keep on hopping!
 
Your next stop on the Calling All Sistahs Blog Hop is Kelly Griglione
 

 **There will be a $15 Gift Certificate given to 3 people that comment along the hop.**   Comments close on July 19th at midnight EST.
 

You can learn all about how Calling All Sistahs got started here.

If you are a facebooker, we'd love for you to join us in our Facebook group! Click here to join
This group is for hop stops, hoppers, and anyone interested in Calling All Sistahs :)
 
If you should get lost along the way please go back to the CAS-ual Fridays Calling All Sistahs Blog Hop.  
 
So remember we have all come together for this blog hop to encourage our Sistahs to do their monthly breast self-exams and yearly mammograms!!


Saturday, June 25, 2016

Be the Reason someone smiles

Hello!  Thanks for stopping by
 
New week calls for a new challenge at The Color Throwdown blog!  This week the colors were so amazing that I can't stop looking at them.   Here is the swatch to work with.
 
 
I am loving the layered look lately.  It seems all of my cards end up with numerous beautiful layers. I first started off with my card base.  It is 5 x 6.5 and I purchase these at Michaels when on sale. I ended up trimming it slightly which I normally do not do.
 
I started out with a 4 x 5.5 white piece of card stock and took the brand new ink from So Suzy Stamps called Wild Watermelon.. and oh is this gorgeous.  I know this will be my go to pink from here on out..   I took my ink blending tool from Tim Holtz and placed the Wild Watermelon down.  I die cut in yellow the brand new stacked stars from Simon Says Stamp.  I left some of the stars intact ..  I ended up cutting down this piece of cardstock as my stars didn't take up as much space as I thought.
 
I then started my layers.. I used the Scalloped square from SugarPea Designs.  Orignally this was from a Stamp of Approval box, but can now be purchased outside of the box.  The next layer is from Craftin Desert Divas Fancy Frames.   The next layer is the Picture Frame die from Craftin Desert Divas.  The pink layer is a regular old cut and I embossed this layer.  Finally one last white square.. I took my Wild Watermelon and drug it around the edges of this piece to make it kinda pop away from the white card base.
 
I then took the Flag Banners from Craftin Desert Divas and used the brand new set from Simon Says Stamp (inspired by Jennifer McGuire) Uplifting Thoughts.  I embossed this with Alabaster from Brutus Monroe.
 
It needed something else.. so I rummaged through my ribbon and found pink.. and had some twine in the mess, so I added that as well. 
 
This card turned out so incredibly gorgeous.  The colors together are stunning.. Be sure to  join in the Color Throwdown Challenge weekly!


Tuesday, June 21, 2016

Love you

Hello!  Thanks so much for stopping by
 
Today I am using So Suzy Stamps and ink bites for my project.  The color combo in the ink bites are gorgeous! 
 
Items I will be using for this project
 
I had watched a video from Jennifer McGuire on stamping a background and then adding white to the center of the card to give it a 'faded' look.  So I tried it on this card.  I used both sizes of spray stamps and randomly placed using the ink bites.  I then placed a layer of white on the center.  In the photo you may not be able to fully tell what is going on, but in person the center has a faded look and then brighter on the outsides..
 
I then took the Swirly Hearts stamp and stamped in the center using the same ink bite collection.  I LOVE that the love you stamp is the only left over color from the ink bite collection.. it stands out and looks fab. 
 
I then placed a few nuvo crystal drops on the card to finish it off.  These crystal drops are some of my first made.. I dropped some out on a piece of acetate in the beginning.. I've also dropped some directly to a card.. I love both ways.. if you drop them on a card .. be very careful that you don't smudge them or place something on top of it.. been there done that. LOL
 
If you have ink bites from So Suzy.. be sure to link up a card here
 
Happy Crafting!


Saturday, June 18, 2016

Happy Birthday!

Hello!  Thanks so much for stopping by.  I am participating in the weekly Color Throwdown  Challenge.  I love this challenge because it always a fun challenge to see what you come up with.  This is CDT397.
 
Challenge information can be found here:  http://colorthrowdown.blogspot.com/
 
 
Here is the color pallet to work with this week.
 
 
I am always in need of Birthday cards, so I decided to take out my Happy Birthday sentiment from So Suzy Stamps.   I first embossed my stamp with Alabaster from Brutus Monroe.  I then took out my Gansai Tambi watercolors and painted green over my sentiment.  I then took brown and yellow and flicked random places. 
 
I topped it off with some green, brown and yellow sequins.


Thursday, June 9, 2016

So Suzy Stamp discount code

Hello! Thanks so much for stopping by
 
Today I wanted to share a 10% discount code for So Suzy Stamps (on your first order).
 
I absolutely love the stamps and all the goodies you can purchase from her store.  To receive the 10% off use this link http://r.sloyalty.com/r/uXSg7faZi1ix .. 
 
Here are a few examples of cards that I have made using So Suzy Stamps.  The background and sentiment is So Suzy.

 
The sentiment is from So Suzy on this card.
 
 
Be sure to use the link http://r.sloyalty.com/r/uXSg7faZi1ix for your 10% off
 
Disclaimer:  I also receive 10% off when you purchase

Monday, April 25, 2016

Wildflowers in the Wind - CDT#389

Hello!  Thanks so much for stopping by!
 
The colors for this weeks Color Throwdown Challenge were gorgeous..   I just happened to purchase a new Rubbernecker Stamp called Wildflowers in the Wind and so I adapted that stamp to the color challenge.
 
 
Here is the color pallet you have to work with
 
I used Stampin Up ink:  Pumpkin Pie, Garden Green, Tangelo Twist
So Suzy Stamps ink bite Thistle Thicket
 
Rubbernecker Stamps:  Wildflowers in the Wind, Freehand Frame and The Garden
 
The Frugal Crafter has an awesome video on how to stamp this particular stamp, Wildflowers in the Wind.  I found it a HUGE help to hear the tip lay your stamp on the photo of the stamp.  Because it is red rubber you can not see to line it up perfectly.  Honestly, Flowers in the wind would never be perfect, so however you get them lined up works.  For me I laid my stamp on the photo and then knew where to place it using my misti to stamp.
 
To add the finishing touch, I took my clarity brushes from So Suzy Stamps and just brushed some Pumpkin Pie over lightly.  Then I stamped my sentiment using Versafine Black onyx.
 
The weekly challenge can be found here.
 
I'm so glad you stopped by.  I hope this inspires you to be crafty.
~Kara


Sunday, April 17, 2016

Color Throwdown #388

 
Hello!  Thanks so much for stopping by!  I absolutely loved the colors in the Color Throwdown #388 challenge that I had to participate. 
 
I used Rose Bloom from So Suzy Stamps, LOVE from Die-Versions, Picture Frame Die from Craftin Desert Divas  , Alabaster embossing powder from Brutus Monroe and Zig Clean Brush markers for my water coloring.
 
I started off stamping the Rose Bloom on Strathmore Water color paper and embossed that with Alabaster powder .  I then took my zigs using 050 Yellow, 030 Blue and 048 Emerald Green with my waterbrush and adding color where needed.  
 
I then took the picture frame die with the blue zig and water brush to create a fading color effect.  I cut the word love and adhered it and then my rose bloom panel.  I then finished it off with some sequins and twine.   For my background I simply took the yellow zig and water brush and colored around the edges. 
 
These colors together turned out gorgeous.  It is a gorgeous mix .  I challenge you to participate in the Color Throwdown Challenge
 
Happy Crafting!
~Kara 


Saturday, April 9, 2016

Simple Cancer Cannot card

Hello!  Thanks so much for stopping by
 
Today I want to share a very simple card I made.  The verse is called Cancer Cannot....
 
I first inked up my background using Pink Ribbon Background from Sparkle N Sprinkle.   I used the Thistle Thicket ink bite from So Suzy Stamps.   I then took my Wink of Stella pink pen and clear pen to color in the hearts.  A photo does not show the glitter, but it adds a special touch to the card.
 
I then took my stamp Cancer Cannot from Verses Rubber Stamps and used my favorite white ink of all time from Brutus Monroe Alabaster.  Stamping this with my Mini Misti (LIFESAVER if you are a new or seasoned stamper) in case my print did not come out good the first time.  I took my heat gun to set the ink.. I didn't want to take any chances on it smearing. 
 
I love kraft paper.. It mixed with anything makes a gorgeous mix.  So I took a Kraft card base (I get mine at Michaels) layers my card and then decided to make a layer under the verse.  Adding some faux stitched lines with my gelly pen and a few dots around the corners of the verse... made the final touch!
 
I added a little stamp on the inside.  I normally do not stamp so there is more writing room, but I felt it was fitting to place the stamp today.  This is also from Sparkle N Sprinkle.
 
 
Thanks so much for stopping by!  I hope this has inspired you to be crafty.  We all have someone in our life who needs some inspiration.  Inspire someone today!
~Kara
 

Tuesday, April 5, 2016

Imagine

Hello!  Thanks so much for stopping by
 
Today I want to show off the new So Suzy Stamps April release!!  If you love flowers... you must check out the release here
 
For my card I cut a base 4 x 5.5 inches.  I use the folded cards from Michaels for my actual card, so I try to always have bases cut.  I ended up going to the larger card size for this card in the final stages.
 
I then took two stamps .. Spray and Mini Spray and randomly place using the Ink Bits collection Highland Spring.   After I had enough sprays all over I stamped and embossed the new Imagine stamp (which I absolutely love).   I used Brutus Monroe embossing powder in Alabaster.   I used the stitched rectangle from MFT Stamps and raised this with foam tape (although it may be hard to see in the photo).
 
Then comes the Nuvo Crystal Drops... I need intervention on these.. once you start making dots.. it is tough to stop.  I do need to pre-make these drops because if you mess up on a card/project .. it is too late!!  I did mess up and I also tried to layer purple over white.. Just a word to the wise.. pre-drop these babies on acetate.
 
I then decided to layer some matching cardstock behind my stamped spray. My final card is 5 x 6.5 and gorgeous!!!  I love fun colors and this combo is just that.
 
Thanks so much for stopping by!  I hope this has sparked some creativity
~Kara


Thursday, January 7, 2016

Snowflakes

Hello!  Thanks so much for stopping by
 
 
Today I wanted to showcase a card I made using my favorite style.. shaker card!!  Shaker cards are so fun and interactive.  They have such a look that I love. 
 
I started out knowing I wanted to use my stamp from So Suzy Stamps - Snowflakes are winter's butterflies.  I just love this sentiment.  I'm not a lover of snow, so to think of it this way puts my mind in a different thought pattern. 
 
I also knew I wanted a shaker element to my card.  I decided to use my Wonky Frame from Avery Elle to make my 'window' .  It's a solid cut so I had to also cut the inside with a die from MFT Stamps blueprints.
 
I added my transparency film to the frame .. I also opted for two layers of foam.  The shaker cards I have been making do not shake as much as I'd like.. So adding another layer made it perfect.  Everything shakes just as I want.  On the base of the shaker I stamped and embossed the sentiment from So Suzy.  I then embossed it in pink.  I learned a little trick from Jennifer McGuire and that is to glue a few of your shaker elements to the background.. that way it looks like it's floating.  I like this look so thank you Jennifer for that tip.
 
I wanted to use the digital stamp from Craftin Desert Divas so I colored this adorable Angel Bear and glued him to my project.   He adds the perfect touch to my shaker.
 
I made my own enamel dots from perler beads, so I placed one in each corner.  And just like that this adorable card took shape.
 
Thanks so much for stopping by!  I hope this has inspired you to be creative and go craft! 
~Kara


This card has been entered to the following:
 Craftin Desert Divas - Let it Snow
Challenge 293 Craft Your Passion - Anything Goes
 Simon Says Stamp - Monday Challenge
Sparkle N Sprinkle - Anything Goes
Through the Craftroom Door - Anything Goes 
Tic Tac Toe Challenge - tic tac toe challenge