Wednesday, December 28, 2016

Happy New Year!

Hello!  Thanks so much for stopping by
 
Where oh where did the Holiday season go??  I got so far behind with my wreath and ornament orders that NO Christmas cards got sent out!!  I had all intentions in making and then I quickly realized it was December 25th and that was not going to happen.  Into my stamp stash I went. 
 
I have a love for fancy fonts and so I found the Wintery Script from Lawn Fawn and knew this would be my card.  I then when to Pinterest for a bit of inspiration and saw circles and twine and all kinds of goodies.. So I got out the Circle die plate from Queen & Company.  I knew this would be it!
 
I first took the die from Queen & Company and cut 25 with my Vagabond 2.  It was super simple and now I have a big stash of circles from the negative. 
 
I then took the Happy New Year stamp and my Mini MISTI (which is the most incredible tool)  and stamped in groups of 5 with Brutus Monroe embossing ink and embossed with Brutus Monroe Gilded.  Once I complete 25 in this process, I started my layering.  I found 3 different golds that I wanted to use.  I adhered the layered piece and then to my card base.
 
I used my Cricut for the inside.  I did not want to handwrite on all 25, so I did a simple New Years message on the inside and let my Cricut do the writing for me.
 
I then added a few stars from a pack I purchased at Hobby Lobby.  After a while, I got to thinking a stamped star would be easier.. So I got out the Papertrey Ink stamp set Star Scribbles and stamped a few stars. 
 
I love the different looks each card holds.  I was bumming that I did not get to send out Christmas cards, but it turned out for the better.. these are SUPER cute and I know the recipients will be surprised to receive the card.
 
 
This card is entered into the Simon Says Wednesday challenge:  Anything Goes


Saturday, December 10, 2016

Merry Christmas (with some snark)

Hello!  Thank you so much for stopping by.
 
If you are hopping with So Suzy Stamps on the Mini Snarkmas blog hop.. Welcome!!  We are posting a mini blog hop, so comment through the hop and you could win $25 from So Suzy Stamps.  See the end of my blog on the details!  FREE shipping through the 15th with a $25 order!
 
 
I am thrilled to share my creation with you.  I have a few friends who will be receiving this card..  Maybe once you see the inside of the card.. you too, can relate?? 
 
I first took a card base and laid out all of my coordinating papers, inks, dies and stamps.  I knew what I had in my mind, so I put it to paper.  I had purchased glitter paper at Hobby Lobby, so this was the perfect time to add some glitter to life. 
 
I then took the Merry Christmas ornament, using my MISTI and with gold embossing powder, heat set this part of my card.


I then used Simply Sinful from the So Suzy Stamps ink bite collection (I highly recommend So Suzy ink bites) and a blender tool to color in red on my ornament.  I then fussy cut around the ornament.  Originally, I wanted to pop this up but ended up placing it flat to my card.
 
 
I then added some sequins for some sparkle
 
Now to the FUN part .. the inside.. the FUNNY part.  You know you can relate to who would make you drink wine instead of coffee??!  Right??


I decided to do a few layers on the inside to match the front.  I stamped my sentiment in versafine black onyx.


That completes my card!  The outside appears to be a nicey nice Christmas card.. and the snark is the funnies on the inside.


Your next stop on the hop is the talented Salima at Salima0705
 
Comment along the hop for your chance to win a $25 gift card for So Suzy Stamps. Leave a comment on all blog hop posts by December 12th, 12pm PT and we will announce the winner later that day.
 
Be sure to stop by So Suzy Stamps and place your order for FREE shipping!


 Mini Snarkmas Blog hop order:


Tuesday, December 6, 2016

Number of Years - So Suzy Stamps Guest Designer


Hello!  Thank you so much for stopping by.  In the month of December, I will be a guest designer 3 weeks for So Suzy Stamps.  I am so excited to show some awesome stamps this month! This month from the 1st- 15th any order over $25 ships FREE !!!   Be sure to go check out the goodies at So Suzy Stamps.
 
So Suzy Stamp used:  Number of Years

Let’s face it; you are always in need of a birthday card!  There are so many times I get caught red handed without a card.  I made up a few birthday cards so that does not happen.  I’d love to share one.
 

      1.    I love the card bases from Michaels.  The base I am using is of 6.5 x  5

  1.  I embossed the yellow card stock with a Darice birthday folder. 
  2.  I then placed a mat under the embossed cardstock.
  3.  I took the stamp I would be using… Age is merely the number of years the world has been enjoying you and placed this on the balloon.  I wanted to be sure it was a for sure fit.
  4. Using the MISTI I then stamped and with white embossing power, I heat set the stamped sentiment.
  5. I used foam tape to raise this balloon
  6. The finishing touches came with a white gel pen.  I added little dots around the red balloon for some interest.  I then took a few pieces of twine and made the strings.


I hope this inspires you to make birthday cards so you too can be prepared!

Be sure to stop by daily for HUGE inspiration of the Guest Designers all December.
So Suzy Stamps Blog


Monday, November 21, 2016

Primitive Christmas


 Hello!  Thank you so much for stopping by

I had time to play around with a few dies from the November release at Craftin Desert Divas and oh my oh my.. my new favs! The Winter Wonderland dies are FUN!

This is the mood board inspiration for November.  When posting on social media, be sure to use #cddmonthly and also join the Facebook group to share your creation.  Here is the group link  https://www.facebook.com/groups/1428163220758119/


1.  I first took a kraft card base 5 x 6.5.  I buy my card bases at Michaels and love that they come with envelopes.
2.  I then laid out all of my card stock I wanted to use.  I made this card with the intention of following the November mood board from Craftin Desert Divas.
3.  I then cut with the picture frame die my bottom layer. 
4.  Next, I cut from the Fancy Frames my next layer.  This is by far my staple of dies.. You must have it LOL!
5.  I then cut the lantern die and candle
6.  Using the Winter Wonderland die set (which is packed full of amazingness) I cut the poinsettia in 4 different shades of brown/beige.  I cut 4 of each so I could layer the poinsettias.  There is a dotted crease on the poinsettia that allows you to nicely shape the flower if you'd like.  I did and it gives it such dimension.
7. Layering the poinsettia to whatever I felt looked nice, I glued them together and placed accordingly on my card.
 
 
 I hope you have enjoyed this card! 


Thursday, November 17, 2016

Believe in Miracles


Hello!  Thanks so much for stopping by.  It is the 17th of November and today is the day we remind a sistah to do a self breast exam.  This monthly blog hop has saved lives!  Lumps have been found through the reminder of these hops, so please don't take this as just another blog hop.  Do the self breast check and remind a friend or family member as well.
 
Michele the owner of Cas-ual Fridays Stamps started this blog hop as a reminder to all women. 
 
This is a blog hop for ALL to participate in.  Hop along with us and you have a chance to win (3) random winners will be chosen among those who comment along the hop to win a $15 gift certificate to the store..Comments must be made by 12:00am EST on November 19th, 2016 to qualify.
 
It would be absolutely incredible if YOU could participate in the monthly bog hop as a card maker!  All you need to use is ONE Cas-ual Fridays Stamp or die to participate.  Please join the Facebook group for more info https://www.facebook.com/groups/1015868698493563/.   The more we get to participate, the more people we reach.. the more lives we can save by early detection!

My card uses the new stamp set from last months release called Powerful Words. I simply lined up the 3 stamps on my MISTI and stamped with Versa Fine Black Onyx.  I then heat embossed clear to give it a shine.

I tied a bow below and that is my card!  It is a simple but powerful card for anyone going through a battle.


Thank you for hoping along.  If you should get lost along the way, please refer back to the Cas-ual Fridays Stamps blog.  Your next stop on the hop if the talented Kelly Griglione


Blog Hop List:

Monday, November 7, 2016

Give Thanks

Hello!  Thanks so much for stopping by.  Kara here from Create By Kara
 
Today I would love to show you a simple card created with a digital stamp called Scarecrow with a fence and can be found here.   When using a digital stamp, do not be intimidated!  I use a Brother Laser Printer for my digi stamps.  They are fun to use as you can make them any size you need. 

1.  I printed the Scarecrow with a Fence digi and colored with Spectrum Noir markers
2.  Next I used the Brother Scan N Cut to trim around the edge.  Don't think you need this device to use a digi.  You could simply use a die from the Fancy Frames selection and cut a frame or base.  You do not need to cut to be able to use these.
3.  I then took the Fancy Frame die set and cut a rectangle on white card stock. 
4.  Using the Outdoor Landscape die set, I took the hill die and cut to use as a mask.  I then laid the mask down and with the Clarity Stencil Brushes I brushed on the blue for the sky.  After the sky I used the other half of the mask and proceeded to brush on the grass color.  I set this aside while I compiled the other parts of my card.
5.  I then took brown card stock and cut 6.25 x 4 and embossed with an embossing folder.  I took brown ink and edged around the sides.  Let this dry completely.. I did not.. so learn from my lesson, LOL!
6.  I then took orange card stock and  trimmed 5.75 x 2.5.  Edged this in orange ink. 
7.  Using the Give Thanks from Thankful Squeaks stamp set and my MISTI.. I stamped the bottom right corner.
8.  I then layered the brown and orange as I wanted and added brown ribbon for a bit of interest.  I attach my ribbon using tape on the back of my card stock.  I then added the white hill piece and glued down my digi scarecrow.
9.  Finally, I added spectrum noir sparkle glitter pen on the pumpkins and sunflower.  The photo may not catch the sparkle.  Also adding a few sprinkles from Dooglebug to the bottom left corner to add the final touches. 


Tuesday, November 1, 2016

Happy Birthday

Hello!  Thank you so much for stopping by
 
I created a card today for the Lawn Fawn Challenge, over at the Simon Says Stamp Wednesday Challenge.
 
Lawn Fawn Products used:
Put a Bow on It
 Let's Bokeh
Scripty Big Words
Lawn Fawn Perfectly Plaid paper pack
 
 
I entered this into the Wednesday Challenge at Simon Says Stamp


Monday, October 24, 2016

Pull yourself together!

Hello!  Thanks so much for stopping by
 
 
When I have ideas for a card, generally I have an idea of who it will be for.   I need to definitely get better at mailing cards, but when I had the idea for this card... I just knew it would be going to one of my girlfriends.  I wouldn't be surprised if it ends up on her desk at work.. She has an amazing sense of humor.
 
I started with the Sizzix Elegant Stand ups for my base.  These give such a gorgeous base (and I may have many of Stephanie's dies).  I also cut the strip along the bottom while cutting the base.  I later added pearls along that strip to dress it up.
 
I then took the stamp Pour Yourself a Drink from So Suzy Stamps and heat embossed in Brutus Monroe gold.  Added some foam dots to raise the panel and a few flat back pearls.
 
Finally, I tied a bow and glued it down.. and a gorgeous stand up card is the end product.
 
 
This card is entered into the Simon Says Stamp Wednesday Challenge:  Link
 
 
Affiliate links may be used in my blog.  This does not cost you anything to purchase. 


Sunday, October 23, 2016

Be careful what you wish for....

Hello!  Thank you so much for stopping by
 
About a month ago, Suzy from So Suzy Stamps asked if I'd be interested in being a Snark Ambassador... and I said YES!  Through out the months I'll be making cards to show Snarky stamps from her line.  You can check out her line of Snarky here 
 
I started to make my card and quickly that turned into 2 cards in different colors and shapes. 
 
I started off stamping the Spray stamps in random pattern and colors.  I came up with two combo of colors that I just love.  I used all So Suzy Ink Bites for my cards. 
 
My first card, I knew what I wanted in my head.  I used a 5.5 x 5.5 card base and cut a panel from white card stock.  I then took the inside out circle die from My Favorite things and centered to cut.  I stamped my sentiment and placed foam tape on the back of my panel to make it pop.
 
 
My 2nd card was pretty basic.  I loved the sentiment and wanted a different color card.  I used the inside out rectangle die from My Favorite things and foam tape to pop that up.  It was a super simple and quick card.


So Suzy Stamps products used:
 
Spray (regular and Mini:  here
Be Careful What you wish for:  here
Ink Bites:  here


Affiliate links are used in this blog.  This does not cost you extra.  It let me keep blogging and sharing. 


Monday, October 17, 2016

17th of the Month blog hop reminder


Hello!  Thank you so much for stopping by.  Today is the 17th of the month and that brings a reminder for YOU to do a self breast check or schedule your mammogram if needed.   Don't stop there... remind a friend or family member to do the same!
 
Michele the owner of Cas-ual Fridays Stamps started this blog hop as a reminder to all women.  Today as you read this.. she goes for her year ONE appointment after fighting breast cancer.  Please keep her in your thoughts and prayers today!
 
This is a blog hop for ALL to participate in.  Hop along with us and you have a chance to win the ENTIRE new Cas-ual Fridays release!  Comments must be made by 12:00am EST on October 19th, 2016 to qualify.
 
It would be absolutely incredible if YOU could participate in the monthly bog hop as a card maker!  All you need to use is ONE Cas-ual Fridays Stamp or die to participate.  Please join the Facebook group for more info https://www.facebook.com/groups/1015868698493563/
 
 The more we get to participate, the more people we reach.. the more lives we can save by early detection!
 
Thank you for hoping along.  If you should get lost along the way, please refer back to the Cas-ual Fridays Stamps blog .  Your next stop on the hop if the talented Kelly Griglione
 
Here is the card I created for this month. I was wanting to do a different, but simple kind of card and I had done a collar fold card in the past and it turned out cute.  So this style is a collar fold card. 
 
I used Dream Then Do stamp set for my card. 
 
Here is my card to remind a friend "You've got This"
 
 
Your next stop is Kelly!  Thanks so much for stopping by and remind a friend to do a self check as well!


Kara Stainbrook  ---- You are here
Kelly Griglione  ----- Next stop on the hop


Thursday, September 22, 2016

Happy 1st Birthday Bryndle

Hello!  Thank you so much for stopping by.  Today I am showcasing a card made with My Favorite Things product.  I am entering this into the MFT Stamps Super Star card contest. 
 
When I first saw the card kit Sensational Stitched Flowers card kit.. I KNEW I had to have it.. regardless of how many flowers I already had in my stash.  I had ideas flowing in my mind from the time I hit send. 
 
I received a 1st birthday party invite and on the front was my precious sweet cousins baby.  She has pearls draped on her and all pink.  I just knew the moment I saw the invite .. this is what my card would be using the card kit.
 
I got all of my supplies out and started cutting flowers.  I cut several different shades of pink as well as white.  I left the entire flower die together and just cut repeatedly.  I ended up with TONS of flowers!


I then took my white flowers and with momento rosebud ink and a dauber I edged many of the flowers as well as coloring a bit on them with the dauber.  I probably could have done my entire card in the white with the pink edges..
 
I then started to piece the flowers together using glue. 


I also used Make a Wish die and stamp set to make one single candle for Bryndle's 1st bday. 
 
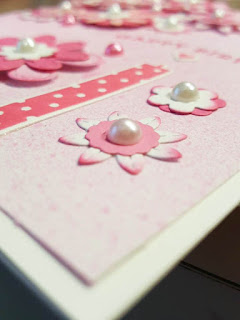
I then added finishing touches to the flowers with flat back pearls and raised some flowers for dimension. 


I could not be happier with the outcome of this card.  This is entered into the Superstar card contest.   I'm obsessed with MFT Stamps and love every single thing released.. Check them out if you haven't yet!


Saturday, September 17, 2016

You've got this!

Hello!  Thanks so much for stopping by
 
It is the 17th of September and that means it is your monthly reminder to do a self check breast exam.  I am truly honored to participate each month in this blog hop.  This months theme is Girl Power!


CAS-UAL FRIDAY's  has their own line of stamps and dies mainly for Breast Cancer cards and it is called Calling All Sistahs and 50% of the profits from the sales of the Calling All Sistahs line goes to the National Breast Cancer Foundation, Inc. for research and medical help.  Check out the line here.  Anyone is welcome to participate in the Blog Hop that happens on the 17th of each month. 
 
**There will be a $15 Gift Certificate given to 3 people that comment along the hop.**   Comments close on September 19th at midnight EST.


Your next stop on the hop is the talented Jeanne Jachna

You can learn all about how Calling All Sistahs got started here.

If you are a facebooker, we'd love for you to join us in our Facebook group! Click here to join
This group is for hop stops, hoppers, and anyone interested in Calling All Sistahs :)
 
If you should get lost along the way please go back to the CAS-ual Fridays Calling All Sistahs Blog Hop.  
 
So remember we have all come together for this blog hop to encourage our Sistahs to do their monthly breast self-exams and yearly mammograms!!
 
I highly encourage you to join in on this fun blog hop by participating.   The more awareness we create.. the more lives we can save.  Just a simple self check can save your life and the life of a friend.
 
Here is my card for the hop!

Cas-ual Fridays products used:
Curtis Background:  http://cas-ualfridaysstamps.com/products/curtis-background
Calling all Sistahs:  http://cas-ualfridaysstamps.com/products/calling-all-sistahs
Dream then Do:  http://cas-ualfridaysstamps.com/products/dream-then-do

Other Products used: 
So Suzy Ink bites:  http://www.sosuzystamps.com/summer-solstice-ink-bite-set/
Craftin Desert Divas shaker tag dies: http://craftindesertdivas.com/shaker-tag-dies/


Your next stop on the hop is the talented Jeanne Jachna


Tuesday, August 30, 2016

I'm here for you


Today I'd like to showcase the Nesting Flower die set!  This is a staple in any collection.  There is so much you can do with this die.  I have shown before that you can also make clouds as well.  I do apologize, but this die is currently out of stock, but check out the other nesting dies available here
 
Today I used the die set as flowers.. the way it was intended to be.  I cut multiple layers from different purples and simply glued my flower together. 
 
For my background, I created using distress inks and placed some purple ribbon behind my flowers for added eye candy.

I used the stamp from Cas-ual Fridays - I'm here for you.  For the light purple background I used the background stamp from a stamp of approval box by Catherine Pooler and heat embossed.  This is from the Lovely Notes collection.

This is a super simple card with lots of possibilities..  You could dress it up even more or keep it simple.  Sometimes simple is best.

Have a great day!!
 

Saturday, August 27, 2016

Thankful for you

Hello!  Thanks so much for stopping by
 
Today I want to share a super quick card I created using a digital file from Craftin Desert Divas called Delightful Daisy.  I used Zig Clean Color Markers on Bristol watercolor paper to achieve the look I was going for.

I print my images using a Brother laser printer.  I have found this printer is great with all mediums and paper. 


I cut two colors of greens for my grass using the Landscape die set.  I then took the Stitched Scallop die to make a cloud in the sky.  To cut my digital flower I used the Brother Scan N Cut.  I never was good with scissors, so this machine for me was a life saver. 

I then pieces it all together for this quick card and stamped Thankful for you from the Thankful Squeaks stamp set.  Added a few sequins and a few dots with a white gel pen..  and complete! 


CDD Products used:
Delightful Daisy - http://craftindesertdivas.com/delightful-daisy-digital-stamp/
Landscape dies - http://craftindesertdivas.com/outdoor-landscape-dies/
Stitched Scallop Dies - http://craftindesertdivas.com/stitched-scallop-dies/
Thankful Squeaks - http://craftindesertdivas.com/thankful-squeaks/
Pastel Paradise sequins -   http://craftindesertdivas.com/pastel-paradise-sequins/


Wednesday, August 24, 2016

Retro Happy Birthday!

Hello!  Thanks so much for stopping by.  Featuring the Retro Happy Birthday die from Die Versions.    The retro line is so fun I decided to play around.  I do apologize, but the Retro Happy Birthday is out of stock right now.  Check out the other Retro Dies available here.
 
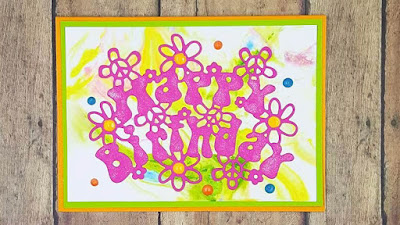
To create my background I used the shaving cream technique.  I watched a few YouTube videos to get the feel for it.  This is a super messy technique, but oh so pretty.  I knew I wanted a 'retro' or tie dye look.. so I chose the reinker colors I thought would look best for that 'style'.  I used the reinkers from So Suzy Stamps and they are just perfect for the look I was going for.
 
I made these before I went to bed so it would be dry the next day.  I do have to say the shaving cream smelled wonderful!  LOL
 
 
Here is what I ended up with.  You get TONS of prints out of one shaving cream session.  I could have done even more by adding other colors near the end.


I then cut the Retro Happy Birthday die on pink paper to make it stand out.  I glued it down and applied Spectrum Noir clear sparkle.  This can dress anything up and who doesn't love a glitter look!  I then finished it off with some new Ranger enamel accents. 


Have a great day!